How to Reset a Security Camera
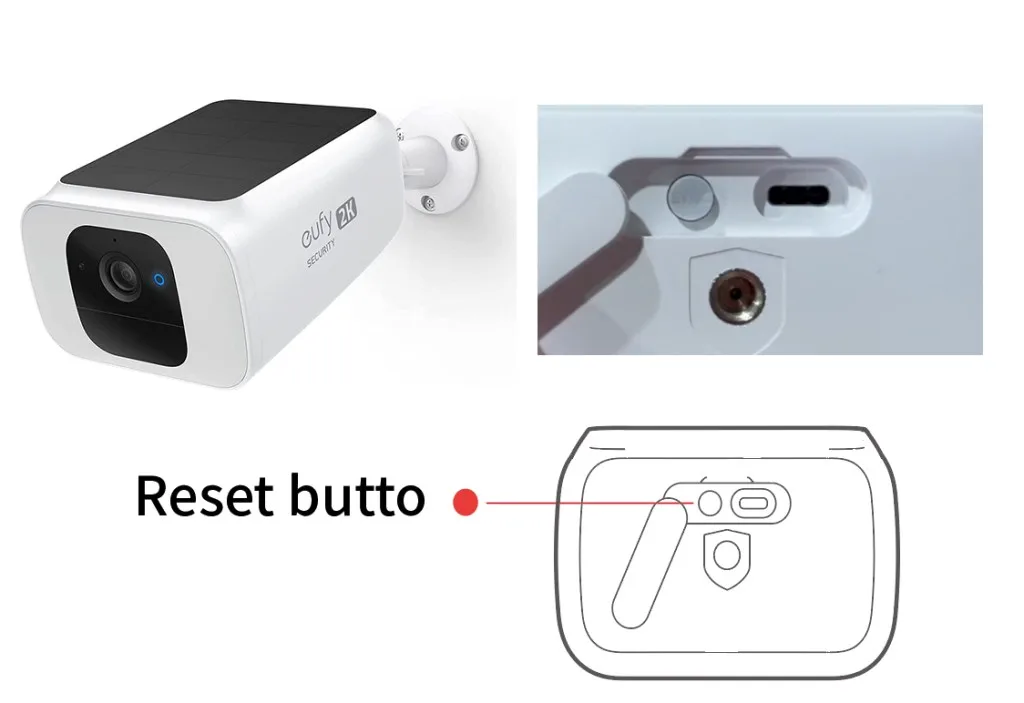
Image source: Bing (Web (fair-use with source credit))
When your security camera isn't working right, the first thought is often to reset it. This is a common fix for many technical glitches, from connectivity issues to unresponsive controls. Learning how to reset a security camera can save you time and money, bypassing the need for costly repairs or replacements.
Our research indicates that most users encounter issues that a simple reset can resolve, but the exact steps vary widely by manufacturer. For example, adherence to specific firmware reset protocols, as outlined by manufacturers like Lorex Technology, often ensures successful restoration of default settings, typically with a process taking between 30 to 90 seconds. Understanding these differences is key to a smooth troubleshooting experience.
Quick Answer: How to Reset Your Security Camera
Resetting a security camera usually involves locating a physical reset button or pinhole on the device, then pressing and holding it while powering the camera on or off. This action restores the camera to its factory default settings, clearing passwords and network configurations. Always consult your camera's manual for precise instructions, as methods differ between brands like Arlo, Ring, or Wyze.
Security Camera Reset: The Big Picture
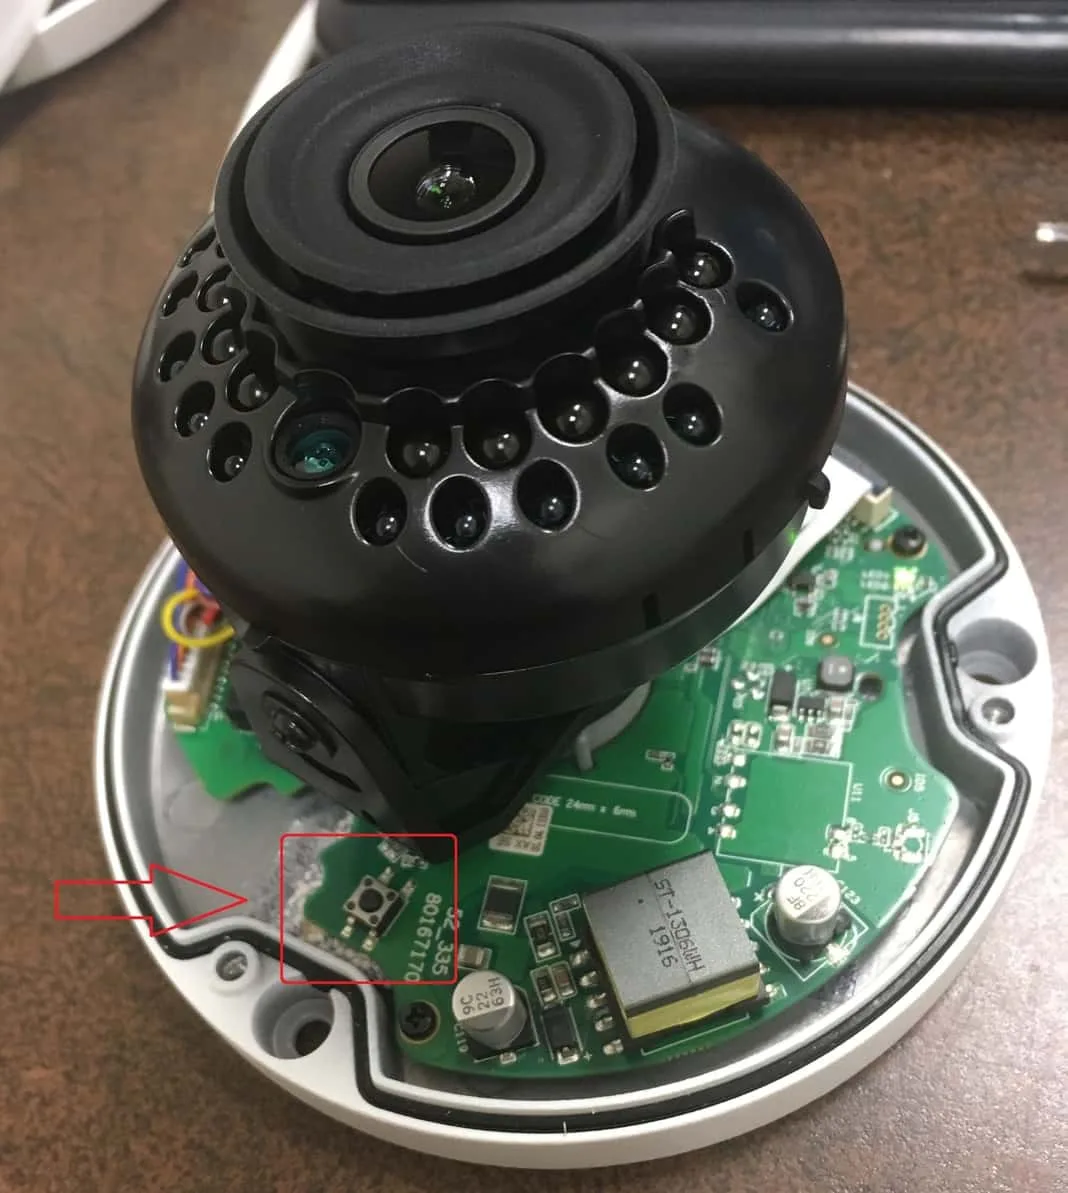
Image source: Web (Bing) / ad.schloemer-gmbh.de (Web image (fair-use with source credit))
Resetting a security camera essentially means returning it to its original, out-of-the-box state. Think of it like wiping your computer clean and starting fresh. This process is crucial for resolving a variety of issues, from a forgotten password to persistent software glitches that prevent the camera from functioning correctly.
It's a powerful troubleshooting tool, but it's important to know that it will erase any custom settings you've made, including Wi-Fi passwords, camera names, and motion detection zones.
Before you dive in, it's worth noting that there are typically two main types of resets: a soft reset (often just a reboot or power cycle) and a hard reset (a factory reset). A reboot simply restarts the camera, which can fix temporary software hiccups without losing any settings. A hard reset, however, wipes everything clean and returns the camera to its factory defaults, which is what most people mean when they ask "how to reset a security camera." This guide focuses on the latter.
Step-by-Step: Resetting Your Camera
Resetting your security camera is usually straightforward, but the exact procedure depends heavily on the specific model. Generally, it involves a physical action on the camera itself. We've broken down the most common methods and considerations to guide you through the process.
Choosing the Right Reset Method (Factory vs. Network)
Not all resets are created equal, and understanding the difference can save you from unnecessary steps or data loss.
- Factory Reset: This is the most comprehensive reset. It wipes all custom settings, including Wi-Fi credentials, passwords, user accounts, and any saved configurations. The camera reverts to the exact state it was in when you first unboxed it. This is your go-to for severe issues like forgotten passwords, unresponsive devices, or when preparing to sell or give away the camera.
- Network Reset: Some cameras offer a specific network reset function. This typically only clears the Wi-Fi or Ethernet connection settings, allowing you to reconfigure the network without affecting other custom settings like motion detection or recording schedules. This is useful if you've changed your Wi-Fi password or router and need to reconnect the camera without redoing everything.
Finding the Reset Button or Pinhole
The physical location of the reset mechanism is the first hurdle. It's usually a small, often recessed button or a pinhole designed to prevent accidental presses.
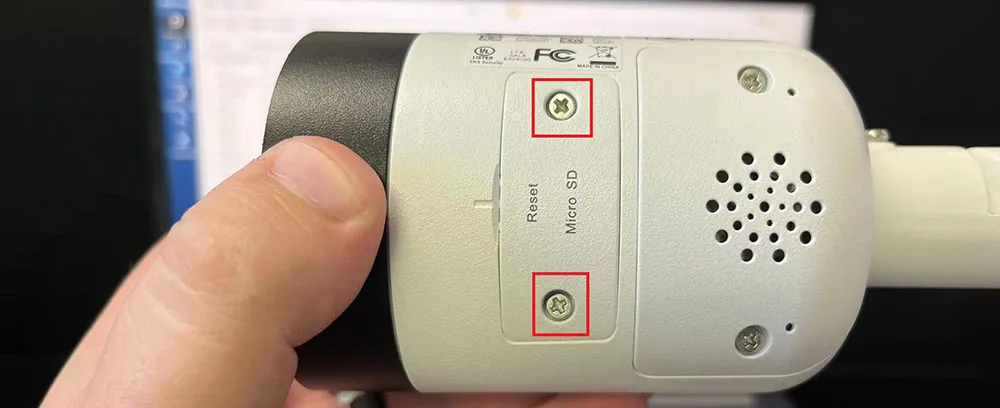
Image source: Web (Bing) / ptzcamerasystems.com (Web image (fair-use with source credit))
- Common Locations:
- On the back or bottom of the camera body.
- Inside battery compartments (for battery-powered cameras).
- Beneath a small panel that might need to be unscrewed.
- Integrated into a port, like an Ethernet port.
- Identifying the Button: Look for a small, tactile button labeled "Reset," "RST," or a similar indicator. If it's a pinhole, you'll need a straightened paperclip, a toothpick, or a similar pointed object to press it.
Performing the Reset: What to Expect
The actual reset action typically requires a bit of coordination with the camera's power. Manufacturer specifications, like those for some Reolink models, detail this process, often indicating a hold time of 10-15 seconds.
General Procedure:
- Power On or Off: Some cameras require you to press the reset button while the camera is powered OFF, then turn it on. Others require the camera to be powered ON. Always check your manual.
- Press and Hold: Using your tool (if it's a pinhole) or finger, press and hold the reset button.
- Observe Indicator Lights: Watch for any LED lights on the camera. They might change color, flash, or turn off entirely, signaling that the reset process has begun.
- Hold Duration: Continue holding the button for the duration specified in your camera's manual, typically between 10 to 30 seconds. For example, some cameras from Ubiquiti UniFi Protect require a 15-second hold.
- Release Button: Once the time is up or you see a specific indicator light pattern, release the button.
- Wait for Reboot: The camera will likely reboot itself. This can take several minutes, during which the indicator lights will change. Do not unplug the camera during this process.
Resetting Without a Button (App/Web Interface)
If your camera has a working connection and you can access its interface, a software-based reset is often an option and can be preferable to a physical reset.
- Mobile App: Open your camera's dedicated mobile app. Navigate to the device settings or management section. Look for options like "Device Settings," "Advanced Settings," or "System." Within these menus, you should find an option for "Factory Reset," "Restore Defaults," or "Reset Device." Confirm your choice when prompted.
- Web Interface: If your camera can be accessed via a web browser (common for IP cameras), log in to its IP address. The reset option will likely be found in the system, administration, or maintenance sections of the web portal. It's often labeled "Restore Factory Defaults."
Is a Reset Right for You?
Before you grab that paperclip, consider if a reset is truly necessary. A reset is a powerful tool, but it's a last resort for some problems.
- When to Reset:
- You've forgotten your camera's password.
- The camera is unresponsive, frozen, or constantly glitching.
- You're experiencing persistent connectivity problems that other troubleshooting steps haven't fixed.
- You're selling or giving the camera to someone else and want to remove your personal data.
- You've made significant configuration errors that are difficult to undo manually.
- When NOT to Reset:
- The camera is working fine, and you're just curious about the process.
- You have a minor issue that can be fixed with a simple reboot (power cycle).
- You haven't backed up crucial footage and the reset will erase it permanently.
Common Pitfalls to Avoid During a Reset
Even with a straightforward process, it's easy to stumble. Forewarned is forearmed, so here are the most common mistakes people make when resetting their security cameras.
- Not Checking the Manual: This is number one. Every camera is different. Assuming the reset process is the same across all brands or even models within the same brand can lead to frustration or even damage. Your camera's user manual is your best friend here.
- Unplugging During Reset: The camera needs to complete its internal processes after the reset command. Unplugging it mid-reset can corrupt its firmware, potentially turning it into a useless brick. Always wait for the camera to fully reboot on its own.
- Forgetting to Reconfigure: A factory reset erases everything. You'll need to set up your Wi-Fi, create a new password, and reconfigure all your motion zones, notifications, and recording settings afterward. Some users forget this and are surprised when their camera isn't behaving as it did before.
- Using the Wrong Tool: For pinhole buttons, using something too large or sharp can damage the button mechanism or the camera housing. A standard paperclip or a fine-tipped toothpick is usually sufficient.
- Incorrect Button Hold Time: Holding the button for too short or too long can result in the reset not initiating or causing unintended actions. Stick to the manufacturer's recommended time, typically found in the user manual or on their support website.
- Ignoring Indicator Lights: Those little lights are there for a reason. They provide feedback on the camera's status. Missing a light change might mean the reset didn't take, or that you should be holding the button longer.
Troubleshooting After a Reset
So, you've reset your camera. Great! Now what?
Usually, it means re-setting it up from scratch. But sometimes, things don't go as smoothly as planned.
- Camera Won't Boot Up: If the camera doesn't power on or show any signs of life after the reset, it might indicate a deeper firmware issue or even a hardware problem. Ensure it's properly plugged into a working power source. If it still fails, contact the manufacturer's support.
- Cannot Reconnect to Wi-Fi: This is common if you've changed your Wi-Fi network name (SSID) or password. Make sure you're entering the correct details into the camera's setup process. Some older cameras may also have issues with newer Wi-Fi standards (like WPA3); check your camera's specifications.
- App Doesn't Detect the Camera: After a reset, the camera reverts to its default IP address. Your mobile app or computer needs to find it on the network again. Often, this involves re-scanning for devices or manually re-adding the camera within the app, sometimes by scanning a QR code on the camera itself.
- Password Reset Fails: If you reset the camera to regain access and are still prompted for a password, you might have performed a different type of reset or the factory reset didn't complete successfully. Double-check your manual for the exact password reset procedure for your model.
- Firmware Update Required: Many cameras will prompt for a firmware update immediately after a factory reset. It’s crucial to perform this update, as it often includes bug fixes that resolve issues you might have been experiencing. Ensure you have a stable internet connection for this.
Frequently Asked Questions About Camera Resets
How long does a camera reset typically take?
A typical factory reset process, from holding the button to the camera fully rebooting and being ready for setup, can take anywhere from 2 to 10 minutes. Some complex systems might take longer.
Will resetting my camera delete recorded footage?
Yes, a factory reset will usually erase all local recordings stored on the camera's internal memory or an inserted SD card. If your footage is stored on a cloud service, it generally remains there, but you might need to re-link your camera to that service.
Can I reset my camera remotely through the app?
Many modern security cameras allow for remote factory resets through their dedicated mobile apps or web interfaces. This is convenient if the camera is physically inaccessible but still connected to your network.
What's the difference between a reboot and a factory reset?
A reboot (or power cycle) simply restarts the camera and is a temporary fix for minor glitches, keeping all your settings intact. A factory reset wipes all custom settings, passwords, and network configurations, returning the camera to its original out-of-the-box state.
2 Comments