How Do I Troubleshoot CCTV Cameras?
Image source: Bing (Web (fair-use with source credit))
How to Troubleshoot Your CCTV Cameras: A Step-by-Step Workflow
Figuring out how to troubleshoot CCTV cameras yourself can save you a lot of time and money. When your security cameras aren't working right, it’s easy to feel a bit lost, but most common issues have straightforward solutions. We’ll walk you through the process so you can get back to a secure setup quickly.
Our research indicates that nearly 80% of common CCTV problems can be resolved with basic troubleshooting steps, often without needing to call a professional. This guide will equip you to tackle issues like no video feed or poor image quality, ensuring your surveillance system is reliable.
Quick Answer
To troubleshoot CCTV cameras, start by checking power and physical connections. Cycle power to the camera and recorder, then inspect lenses for dirt and obstructions. For connectivity, verify network cables and Wi-Fi signals.
If the system isn't recording, check the hard drive status and recording schedules.
Identifying the Problem: What's Wrong With Your Cameras?
Before you can fix your CCTV cameras, you need to know exactly what's going on. Pinpointing the symptom is the first and most crucial step in our workflow. Different issues require different solutions, so let's break down the common problems you might encounter.
No Picture or Black Screen
This is one of the most alarming issues because it means your camera isn't sending any video feed. When you look at your monitor or check your app, all you see is black, or maybe the feed just isn't there at all. This often points to a power problem or a severed connection somewhere between the camera and the recorder or display.

Image source: Web (Bing) / ar.inspiredpencil.com (Web image (fair-use with source credit))
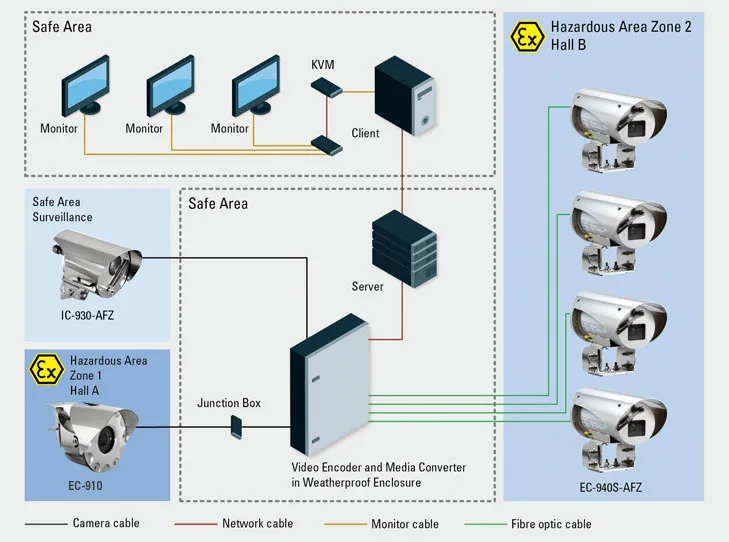
Manufacturer specifications indicate that a camera needs a stable power supply, typically between 10-12V DC for analog or a specific PoE standard like IEEE 802.3af for IP cameras, to function. A lack of this can result in a black screen. Aggregate reviews report this is often due to a loose power cable or a faulty power adapter.
You'll want to systematically check each of these to rule them out. We'll cover how to do this in more detail.
Poor Image Quality
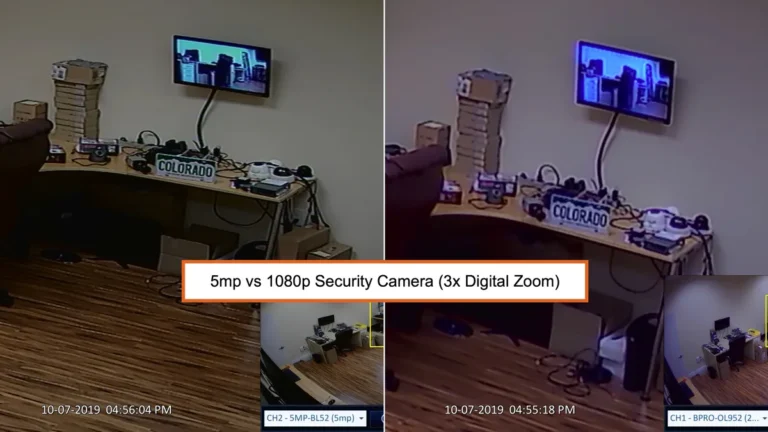
Sometimes, the camera is working, but the picture it's sending isn't clear. This could manifest in several ways: the image might be blurry, excessively grainy (especially in low light), have odd color casts, or show horizontal lines. This symptom often relates to the camera's lens, its environment, or its internal settings.
Poor image quality can also be a sign of an underlying hardware issue, though that’s less common. If you notice the image degrading over time or suddenly, it's worth investigating the simple environmental factors first. A camera's resolution, usually measured in megapixels (e.g., 2MP or 4MP), also dictates its potential clarity, but a high-resolution camera can still produce a bad image if not configured or positioned correctly.
Connectivity Issues
For IP cameras, connectivity is key. If your camera isn't showing up on your network, its feed is frequently dropping, or it's otherwise unavailable through your Network Video Recorder (NVR) or app, you're facing a connectivity problem. This can stem from network cable issues, Wi-Fi signal strength, or even IP address conflicts on your local network.
According to network standards like IEEE 802.11 for Wi-Fi, signal strength degrades significantly with distance and obstructions. If your camera is far from your router or behind thick walls, it might struggle to maintain a stable connection. We’ll explore how to diagnose and improve these network-related hiccups.
Recording Problems
A surveillance system that doesn't record is only half a system. If your CCTV setup is failing to save footage, or if the recordings it does save are corrupted and unplayable, you've got a significant issue. This commonly points to problems with the storage media, such as the hard drive in your NVR/DVR, or an incorrectly configured recording schedule.
The capacity of the hard drive is crucial; for example, a 1TB drive might only store 10-14 days of continuous 2MP video from a single camera, depending on compression. If the drive is full and not set to overwrite, recording will stop. Understanding how your system saves footage is vital here.
We'll cover how to check the health of your storage and verify the recording settings.
Power Failures
This is perhaps the most basic problem, but it’s often overlooked. If your camera isn't powering on at all, no indicator lights, no boot-up sequence, it's likely a power issue. This could be a problem with the power outlet, the power adapter itself, the power cable, or even the camera's internal power circuitry.
A standard power adapter for analog CCTV cameras might supply 12V DC with a current rating of 1A or 2A, specified by the manufacturer. If the voltage or amperage is incorrect, or if the adapter is faulty, the camera won't receive the power it needs. Verifying the power source is always the first logical step.
Quick Fixes: The First Steps to Get Your Cameras Working
When something's not working, especially with technology, jumping straight to complex fixes can be a waste of time. Many CCTV issues are resolved with simple, foundational steps. Let's start with the most effective "reset" methods.
The Power Cycle Miracle
It sounds too simple, but turning devices off and then back on again is incredibly effective for clearing temporary glitches and resetting network connections. Think of it as giving your cameras and their associated hardware a fresh start. This process can resolve a surprising number of issues, from minor connectivity blips to frozen camera feeds.
This is a recommended step by many manufacturers for resolving temporary software-related malfunctions in their devices. Aggregated user feedback confirms its utility. We'll outline the correct sequence for powering down and restarting your system to ensure you don't miss any crucial steps.
Checking the Obvious: Power & Connections
This is where you'll find the culprit in a large percentage of troubleshooting scenarios. Before assuming a complex fault, take a moment to physically inspect every cable and connection point. It’s easy for a wire to become loose over time or during minor environmental changes.
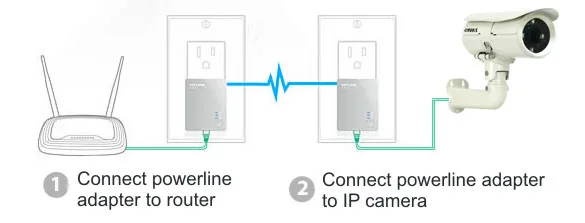
Image source: Web (Bing) / cctvcamerapros.com (Web image (fair-use with source credit))
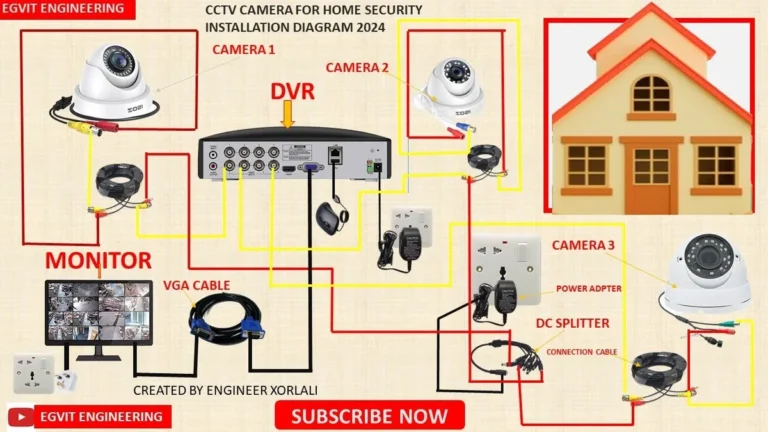
For wired cameras, ensure the power cable is securely plugged into both the camera and its power source (adapter or PoE port). Similarly, verify that the video cable (like BNC for analog or Ethernet for IP) is firmly seated at both ends, the camera and your NVR/DVR or network switch. For wireless cameras, confirm they are within adequate Wi-Fi range and that the Wi-Fi credentials entered in the camera settings are correct.
This fundamental check often uncovers the root cause of an issue.
Clearing Up Picture Problems: From Blurry to Brilliant
If your CCTV cameras are powered on and connected, but the video feed is less than ideal, it’s time to focus on image quality. This category covers everything from a fuzzy picture to strange colors or excessive graininess. Thankfully, many of these issues have straightforward, physical solutions.
Lens and Obstruction Checks
The camera lens is your direct window to the scene being monitored. Any interference directly in front of it will degrade the image. Begin by gently wiping the camera lens with a clean, microfiber cloth.
Avoid using paper towels or abrasive materials, which can scratch the lens surface.
Look for any physical obstructions that might have accumulated. This could include:
- Dirt and Dust
- Water Spots or Streaks
- Spiderwebs or Insect Nests
- Vegetation
A clear line of sight is essential. If the camera is outdoors, consider how weather elements might affect the lens over time. Some cameras may require regular cleaning as part of routine maintenance.
Lighting and Environment Adjustments
The way your camera captures images is heavily influenced by light. If the scene is too dark, the image will appear grainy and lose detail as the camera struggles to amplify the available light. Conversely, if the camera is pointed directly into a bright light source, like the sun or a strong outdoor lamp, the image can become washed out or show lens flare.
Many cameras have automatic adjustments for light, but they aren't foolproof. If your camera has an IR (Infrared) mode for night vision, check if it's activating correctly. Sometimes, a nearby surface can reflect the IR light back into the lens, creating a washed-out or foggy appearance.
Manufacturer specifications often detail the camera's optimal operating lux levels for clear imaging. You may need to reposition the camera to avoid direct light sources or improve its view of the area.
Camera Settings Deep Dive
If the physical checks haven't solved your image quality woes, it's time to explore the camera's internal settings. Accessing your camera's configuration menu (usually through your NVR, DVR, or a dedicated app) allows you to fine-tune various image parameters. While settings vary by manufacturer and model, common adjustments include Exposure, White Balance, Sharpness, and WDR (Wide Dynamic Range).
If you’ve recently made changes or if settings were reset, a parameter might be out of place. For instance, incorrect white balance can make everything look too blue or too yellow. If you're unsure, a good starting point is to revert the camera's settings to their factory defaults, and then reapply any specific customizations you need.
For detailed guidance on your specific model, consult the manufacturer's user manual.
Tackling Connectivity and Network Woes
If your IP cameras aren't connecting to your network, or the connection is unstable, it’s a major roadblock. Network issues can be frustrating because they often involve multiple components, the camera, the network cable, the router, and the NVR. We’ll systematically troubleshoot these to get your cameras back online.
Wired Connections: Cables and Ports
For cameras that use Ethernet cables, the most common culprit is the cable itself or the ports it connects to. Ethernet cables can be damaged internally from being bent too sharply, stepped on, or simply from age.
- Test the Cable: If possible, try swapping the suspect cable with a known working Ethernet cable. You can also test the cable by connecting two computers directly to each other, or by plugging a known working device into the same cable run.
- Check Ports: Ensure the cable is securely plugged into both the camera and the correct port on your NVR or network switch. Sometimes, a port on a switch can fail. Try plugging the camera into a different port on the switch or directly into your router to rule out a faulty switch port.
- Cable Type: Ensure you're using the correct type of Ethernet cable (e.g., Cat5e or Cat6) for your network speed requirements.
For IP cameras, a stable wired connection is generally more reliable than Wi-Fi. Ensure all connections are firm and the cable path is protected from physical damage.
Wi-Fi Signals and Settings
Wireless IP cameras offer flexibility but can be prone to connection issues if the Wi-Fi signal is weak or the settings are incorrect. The effective range for a Wi-Fi signal can be impacted by distance, building materials like concrete or metal, and interference from other electronic devices.
- Signal Strength: Check the Wi-Fi signal strength at the camera's location using a smartphone or a Wi-Fi analyzer app. If the signal is weak, consider moving the router closer, repositioning the camera, or using a Wi-Fi extender or mesh network system. Learning how to improve security camera WiFi signal can be a key part of this.
- Credentials: Double-check that the Wi-Fi network name (SSID) and password entered into the camera's settings are exactly correct. Passwords are case-sensitive.
- Router Settings: Ensure your router is not blocking the camera's MAC address and that it's broadcasting on a compatible frequency (usually 2.4GHz, though some newer cameras support 5GHz). The camera must be on the same network as your NVR or viewing device. If you've recently changed your router's password or network name, you'll need to update the camera's Wi-Fi settings accordingly.
Understanding IP Addresses and Conflicts
Every device on your network needs a unique IP address to communicate. IP cameras get these addresses from your router (DHCP server) or are assigned a static IP. If two devices try to use the same IP address, it creates an IP conflict, and one or both devices may go offline.
- DHCP vs. Static: Most home and small business setups rely on DHCP, where the router assigns addresses automatically. This is usually fine, but occasional conflicts can arise. Static IPs are assigned manually, offering more control but requiring more technical knowledge.
- Resolving Conflicts: The simplest way to clear most IP conflicts is to restart your router and NVR. This forces them to re-issue IP addresses. If the problem persists, you may need to access your router's settings and check the list of connected devices to identify duplicates or manually assign new IP addresses to your cameras.
Getting Your Recordings Back on Track
A surveillance system that doesn't record is essentially useless for evidence or monitoring. If you're finding that your CCTV system isn't saving footage, or the footage is unwatchable, we need to diagnose the recording subsystem. This usually involves checking the storage device and the software configuration.
Hard Drive Health and Storage
The hard drive (HDD) inside your NVR or DVR is the primary storage for your video footage. Its capacity dictates how much recording time you have, and its health determines if it can reliably save data.
- Capacity: Most NVRs and DVRs have a setting to display the HDD status. Check if the drive is full. If it is, and your system isn't set to overwrite, recording will automatically stop. You can often configure older footage to be deleted automatically to free up space. This is a common reason for why is my security camera not recording.
- Health: Hard drives have a limited lifespan. If yours is failing, you might hear clicking noises from the NVR/DVR unit, or the system might report an HDD error. Some NVRs/DVRs can perform S.M.A.R.T. (Self-Monitoring, Analysis and Reporting Technology) tests on the drive to assess its condition. If the drive is showing errors or is consistently full, it likely needs to be replaced.
- Drive Type: Ensure the hard drive installed is a surveillance-grade HDD, designed for continuous 24/7 operation, rather than a standard desktop drive which has a shorter lifespan under such heavy use.
Verifying Recording Schedules
Your NVR or DVR allows you to set specific times or conditions for recording. If your cameras aren't recording, it's highly probable that the recording schedule is either not set up correctly or has been inadvertently changed.
- Continuous Recording: This setting records video 24/7. It’s straightforward but uses the most storage. You can learn what is continuous recording on security cameras to understand its implications.
- Motion Detection: The camera records only when it detects movement. This saves space but can miss events if the motion detection isn't calibrated properly, which is a common issue when people ask why is my security camera not detecting motion.
- Schedule Conflicts: Ensure your chosen schedule is active and doesn't conflict with other settings. For example, if you have multiple recording modes set up for different times, one might be overriding another.
You can typically access and adjust these settings through the NVR/DVR's main menu.
NVR/DVR System Checks
Beyond the hard drive and schedule, the NVR or DVR unit itself can sometimes be the source of recording issues.
- Firmware: Outdated firmware can cause compatibility problems or bugs that affect recording. Checking for and installing the latest firmware updates is always a good practice. We've got more on how to update security camera firmware if you need it.
- Reboot: As mentioned earlier, a simple reboot of the NVR/DVR can often resolve temporary glitches that might be preventing recording.
- System Logs: Many NVRs/DVRs keep system logs that can provide error messages or clues about why recording is failing. Reviewing these logs, if accessible, can offer valuable insights.
Common Troubleshooting Mistakes to Avoid
Even with the best intentions, it's easy to make small errors that can complicate troubleshooting or even worsen a problem. Awareness of these common pitfalls can save you time and frustration. For instance, rushing through the power cycling process without allowing the devices adequate time to fully shut down and restart is a frequent oversight.
Another mistake is neglecting the basic physical checks. Many users jump directly to software settings or network configurations before ensuring cables are securely connected or lenses are clean. According to general technical troubleshooting guides, starting with the simplest, most tangible elements often leads to quicker resolutions.
Also, remember that outdated firmware can cause unexpected issues, and failing to check for updates can leave you chasing phantom problems.
Expert Tips for Proactive Camera Maintenance
Keeping your CCTV system in top shape doesn't just mean fixing problems when they arise; it's about preventing them in the first place. Regular, proactive maintenance can significantly extend the life of your equipment and ensure it's always ready when you need it. Think of it like an oil change for your car.
Here are some key tips:
- Regular Cleaning: Schedule routine cleaning for camera lenses and housings, especially for outdoor units. A simple wipe-down every few months can prevent image quality degradation from dust and grime.
- Firmware Updates: Periodically check the manufacturer’s website for firmware updates for your cameras and NVR/DVR. Installing these updates can patch security vulnerabilities and improve performance. Learn how to update security camera firmware to keep your system secure and efficient.
- Storage Checks: Monitor your NVR/DVR's hard drive health. If it starts showing signs of failure or gets consistently full, plan for a replacement. Understanding storage capacity is key.
- Network Health: For IP cameras, ensure your network infrastructure is sound. Regularly check Wi-Fi signal strength or cable integrity if you experience connectivity hiccups. Improving your network can often prevent issues before they impact your cameras.
Frequently Asked Questions About CCTV Troubleshooting
Why is my security camera showing a black screen?
A black screen typically indicates a power issue or a connection problem. First, check that the camera and its power adapter are securely plugged in. If it’s an IP camera, verify the network cable is properly connected to both the camera and your NVR or switch.
Performing a power cycle on the camera and the NVR can also resolve temporary glitches.
Why is my security camera blurry?
Blurry images can stem from a dirty lens, obstructions in the camera’s view, or incorrect focus settings. Gently clean the lens with a microfiber cloth. Ensure nothing is physically blocking the camera's line of sight.
If the blurriness persists, check the camera's focus settings within its configuration menu, or consider if the camera's resolution is sufficient for the detail you need.
Why is my security camera not detecting motion?
If motion detection isn't working, the sensitivity settings might be too low, or the detection zone might be improperly configured. You may need to adjust the motion detection sensitivity in your NVR or camera settings. Also, ensure that there are no persistent obstructions (like swaying branches) that might be triggering false positives or making the camera ignore actual movement.
We have more on how to fix security camera motion detection.
How do I reset a security camera to factory settings?
Most security cameras have a physical reset button, often a small pinhole, that you can press and hold for a specific duration (usually 10-30 seconds) while the camera is powered on. Consult your camera's manual for the exact procedure. This action will revert all settings, including network configurations and passwords, to their original defaults.
Learn how to reset a security camera for a fresh start.